

Nothing’s more annoying than a blurry image ruining your otherwise beautiful design․ You upload a logo from a folder full of old client files, resize a social graphic from a couple years ago, or stretch a small product image a little, and suddenly everything has just a hint of frosted glass․
For graphic designers, marketers and small business owners, nothing damages credibility more than pixelated, low-resolution imagery․ In an age when attention spans are measured in seconds, and your audience forms an opinion before reading a single sentence, clarity is everything when visual communication is critical․ Crisp images convey competence and care, while pixelation conveys the opposite․ In a world of competing scrolling distractions, a little blurriness can erode trust․
That’s where Canva’s new Image Upscaler comes in – instead of scrapping low-resolution assets or completely redoing your designs, you can quickly and easily upscale them right within your project․
What Is Canva’s Image Upscaler?
Canva’s Image Upscaler is an AI tool for increasing the resolution of raster graphics images․ Instead of simply scaling up existing pixels and adding blurriness, the tool analyzes shapes, edges and textures to generate extra detail․ The goal is to grow, but also to refine․
Sources like the Stanford Web Credibility Project shows how strongly visual design influences user’s trust. When images are sharp and intentional, the brand itself appears to be more trustworthy․ When images appear to be low-resolution or old, upscaling is a way for designs to appear more credible while remaining in the Canva ecosystem․
If you’ve already used some of Canva’s AI tools, you might notice a similar philosophy behind the object isolation and background manipulation tools․ For example, our article about Magic Grab discusses how object isolation helps you control the layout of your design․ The Image Upscaler works a little differently but is likewise one of the smarter features within Canva․
When Should You Use the Image Upscaler?
For the best results, work with the highest resolution original file you have․ Unfortunately, design isn’t always so cut and dried․ Files go missing and clients send compressed images pulled from websites․ Legacy graphics need to be remastered for consistency․
The Image Upscaler is especially useful in improving the resolution of social media images that need to be displayed in larger formats․ A square image may be sharp enough for an Instagram post, but could appear blurry if resized to fit a presentation slide or banner․ Upscaling the image before scaling it can address this issue․
It is also useful when reviving logos or restoring other archived brand materials, as it means a small PNG can be used instead of needing a full vector rebuild․ Photographic images of products can also be extracted from earlier e-commerce sites and improved in some way, even if stored in a repository like Wayback Machine.
Screenshot images used in tutorials on websites or taken from dashboards are often very lossy․ It’s worth noticing that using the upscaler first greatly improves readability of text, as no sharpening artifacts are introduced․
How to Use Canva’s Image Upscaler
The Image Upscaler works best on images early in your edits with close consideration at 100% zoom․ Though deceptively simple, how it is employed distinguishes between polished and overprocessed media․ Using the Image Upscaler is simple, while getting optimal results requires a bit more intent․
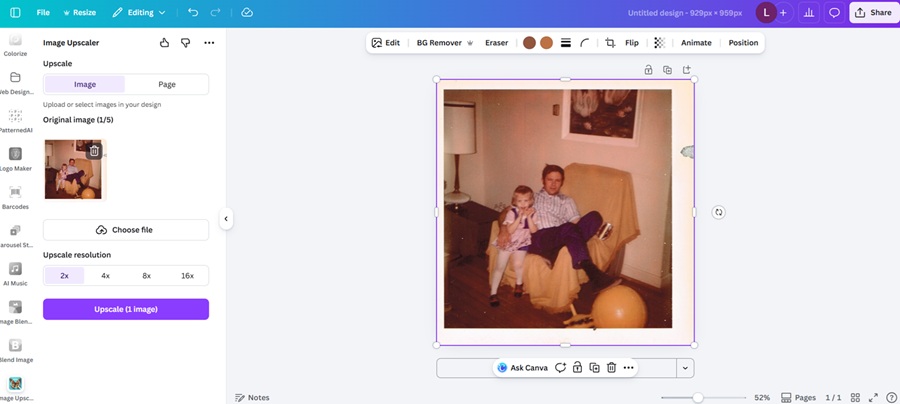
Step 1: Upload and Place Your Image
Upload the highest quality version of your image to Canva․ If the image is compressed, do not upload it, no matter how small․ Once you have the image loaded into your canvas, move it into position approximately where it will be in the final design․
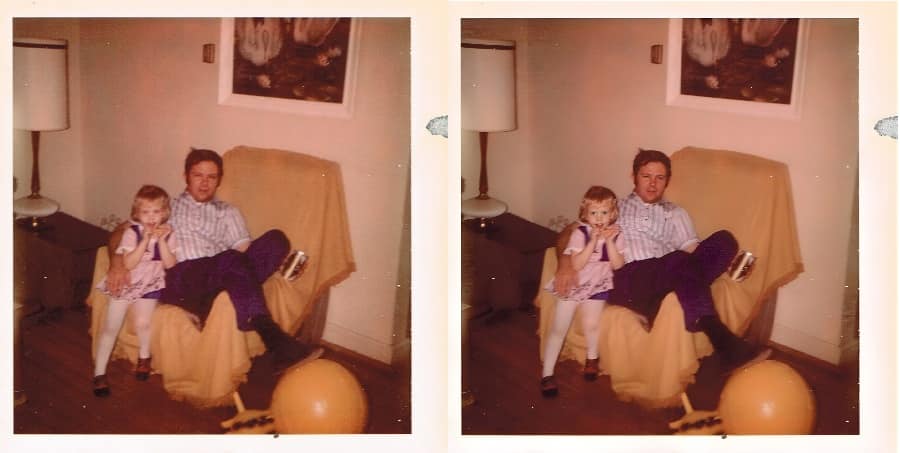
Before you improve the page, make a copy of it so that you can view the difference between the original and the improved images․ If you are doing something that spans multiple pages, it is often easier to put the image on a test page to zoom in․ This saves time if you need to go back and revert the changes․
Step 2: Select the Image and Open Edit Image
Click on the image, and the editing toolbar will pop up․ Click Edit Image․ Navigate through the various editing tools in the side panel, or scroll down in the apps section until finding the Image Upscaler panel․
If you don’t see it, check that the image is selected and is in a supported format, since some older or embedded images don’t support the enhancement tools․ Avoid flattening your image by keeping it as a standard photo or PNG layer to improve AI tool performance․
Step 3: Choose the Appropriate Upscaling Level
Canva usually has different enhancement strengths․ Choose the strength that works best for your design․ After an application, zoom to at least 100% to inspect the application․ Look for no defects anywhere along the edges, including those of the product, text and facial features․ If the image looks blurry, gradually increase the setting․ This should be done in small increments, as larger adjustments can sometimes make the enhancement more unnatural․
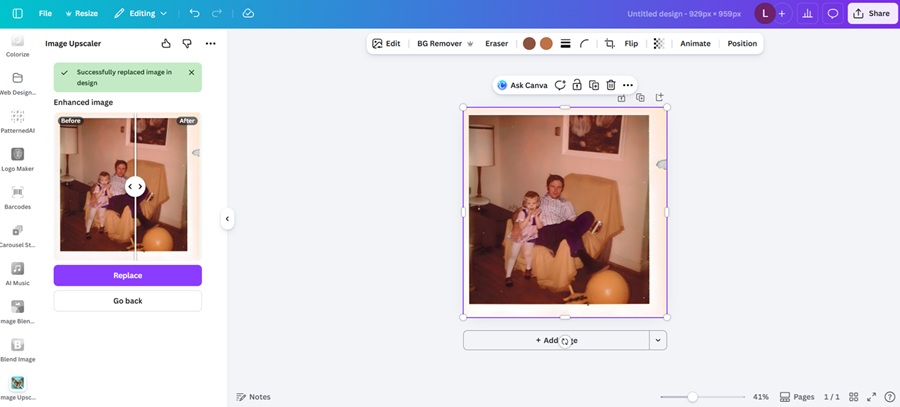
Step 4: Review for Artifacts and Texture Changes
Don’t forget to check the picture after upscale, as the AI upscaler may create some artifacts like overly-smooth skin or slightly distorted patterns․ These are much easier to spot if you zoom in and compare the original with the image processed with the upscale effect on and off․
If the output image appears to be overprocessed, choose slightly lower settings or adjust the contrast/clarity after the upscale․ Check the results in the context of the full layout, not just the output image itself, to evaluate the overall look․
Step 5: Resize and Export With Intent
When satisfied with the enhancement, you can resize the design if needed․ As your image now contains more generated information, it should scale better․ Still, preview the entire layout at full size before exporting․
Export at the highest-quality setting for the intended use. Use PNGs for web graphics, which look better than highly compressed JPEGs. Your export should preserve the file you just edited․
What the Image Upscaler Does Best
While AI tools have great potential, the Image Upscaler’s best use cases are limited to specific features. Here are the top places it shines.
Stronger Edge Definition
One advantage of edge enhancement is that small details such as logos, product silhouettes and architectural lines, will often appear much cleaner with sharper edges rather than jagged or blurred edges․
This is especially useful when images are placed on contrasting backgrounds, to avoid light bleed, and to ensure the intended layout․ For marketing graphics this increases the perceived quality without a complete redesign of the image․
Improved Texture Refinement
Some textures, such as fabric, wood grain and hair, may benefit from upscaling, while other textures that appear smudged or muddy are given greater detail․ Although the tool can’t reproduce the original photographic information, it can generate plausible details to improve realism․ Refining images in lifestyle branding and product photography increases the overall worth of the image without overwhelming it with detail․
Noise Reduction and Smoother Gradients
Low-resolution images may have noise or banding, particularly in shadow regions or color gradients, which is sometimes compensated for by upscaling to produce cleaner, smoother backgrounds․
The enhancement tool is particularly useful in hero banners and full-width website background images, as a smoother gradient can avoid speckling and present a smoother image․
Better Readability for Embedded Text
For images that contain text, such as screenshots or product packaging, upscaling can improve readability. Letters look less fuzzy and pixelated, particularly in the medium range․
It doesn’t turn tiny, illegible fonts into crystal clear typography․ But it generally makes medium-sized text more legible, which can make a big difference to the usability of tutorials, dashboards and social proof graphics․
The image upscaler does have a few limits.
- It can’t restore lost data from a heavily pixilated image.
- The tool might overprocess faces, making skin appear overly smooth and unnatural.
- Raster images still remain resolution dependent, which can cause issues in larger sizes.
Bringing Clarity to Your Designs
When it comes to enlarging an image you already have, Canva’s Image Upscaler provides an easy and unified solution․
It can save poor-quality photographs, improve marketing images, and speed up creative work. Use the tool judiciously. Select softening and realism to avoid looking artificial․ It’s crucial to restore the state of cleanliness, as people form an opinion in an instant․ When you’re working within limitations you didn’t create, taking advantage of this tool by Canva can give your work a professional polish.
Leave a Comment