Do you know how to create a tilt-shift effect on your images? This eye-catching visual technique is surprisingly easy to accomplish if you know what you’re doing. Here’s everything you need to know about what this effect is and how to apply it on any image.
What Does a Tilt-Shift Effect Do?
The tilt-shift technique creates a depth of field where there is none by forcing a perspective shift. It angles the subject vertically while putting the image’s edges out of focus to make it look like the photographer is taking the picture at an angle, even if they’re not. It’s not just a linear blur on the top and bottom — the “tilt” effect is essential to the three-dimensional illusion.
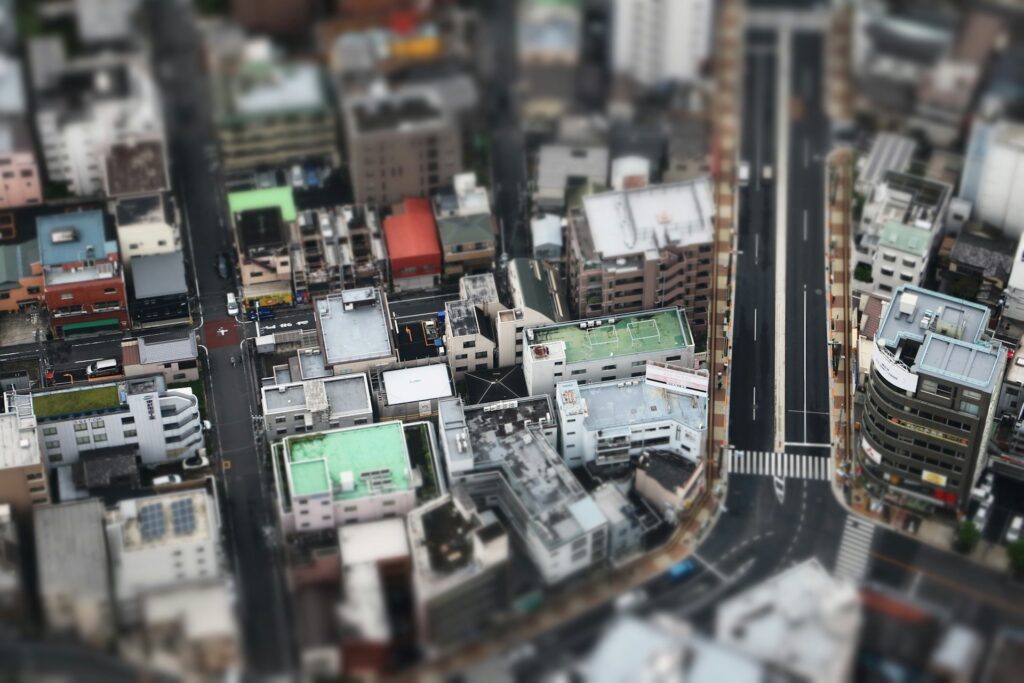
Notably, the tilt-shift effect is infamous for creating false miniaturization. Since it makes a very narrow depth of field — typically a single horizontal strip in the middle of the image — it mimics how a human eye or a macro lens behaves when looking at something up close. Basically, it tricks the viewer into thinking the subject is miniscule.
Photographers typically use this effect to make their images more visually interesting. When they use it sparingly, they create subtle yet eye-catching depth, making their subject seem more prominent. However, they also often oversaturate their image, enhance blur, and obscure faces to magnify the “plastic model” effect, capitalizing on false miniaturization.
What Makes A Good Tilt-Shift Subject?
Like with many photography styles, not everything makes for a good subject. While practicing on whatever’s available when learning how to create a tilt-shift effect is more than okay, you generally want to stick to faraway shots or large subjects.
Having enough distance between you and your subject is critical for forcing perspective and reinforcing the visual trick. This fact is especially true if your goal is to utilize false miniaturization since greater detail can ruin the illusion. For this reason, crowds, cityscapes, landscapes, and real estate are excellent tilt-shift subjects.

Take this image, for instance. Your gaze is probably immediately drawn to the firetruck because of its bright hue and sharpness. Since the camera is far away, the people on the sidewalk have fuzzy faces, making the scene appear like a model town.
The faraway shot of the curving tracks — which provides natural converging lines that slowly fade as they approach the image’s edges — is made possible only by the photographer’s distance from the subject. A closer image could work, but you’d have to be more strategic with lighting, tilt, and framing.
Stunning Examples of Tilt-Shift Photography
This technique can be difficult to spot unless you know what to look for. While unexplainably interesting visuals are great for capturing attention, they make learning challenging. We’ve gathered some examples to help you figure out how to create a tilt-shift effect.

You’ll notice the brick buildings in the middle are sharp, while the ones closer to the bottom — and the bridge at the top — are slightly out of focus. This subtle use of the tilt-shift effect should make you, the viewer, feel like you’re being pulled into the image’s center.

This photograph of a Las Vegas airport is an excellent example of false miniaturization. At first glance, the people, chairs, and gambling machines look like tiny models. However, if you zoom in, you’ll notice they’re very much real — the level of detail in their hair, faces, and clothes gives it away. The intense blurring and strategic lighting make the image convincing.

Why does this cityscape seem small enough to step on? Strategically adjusting the angle between the lens and sensor while putting the image’s edges out of focus makes it seem close despite being far away. The added sharpness in the center adds to the illusion.

Crowds add to the illusion that the photographer captured a minuscule model. In this photograph, the camera’s height, the blurring at the edges, and the lack of detail make everyone appear miniature — even though the image has virtually no tilt.

This aerial shot uses the tilt-shift technique to make the bridge appear elongated. The fog in the upper section makes the blur and fade more believable, lending to a visually interesting image. At the same time, the vehicles, houses, and trees appear uncannily small despite being appropriately proportioned — this is the miniaturization effect at play again.
How Is Tilt-Shift Photography Done?
The tilt-shift technique involves adjusting the lens’s tilt, which changes the angle between it and the image sensor plane. At the same time, you shift the lens, offsetting its relative position to the image sensor plane, which modifies the subject’s converging lines.
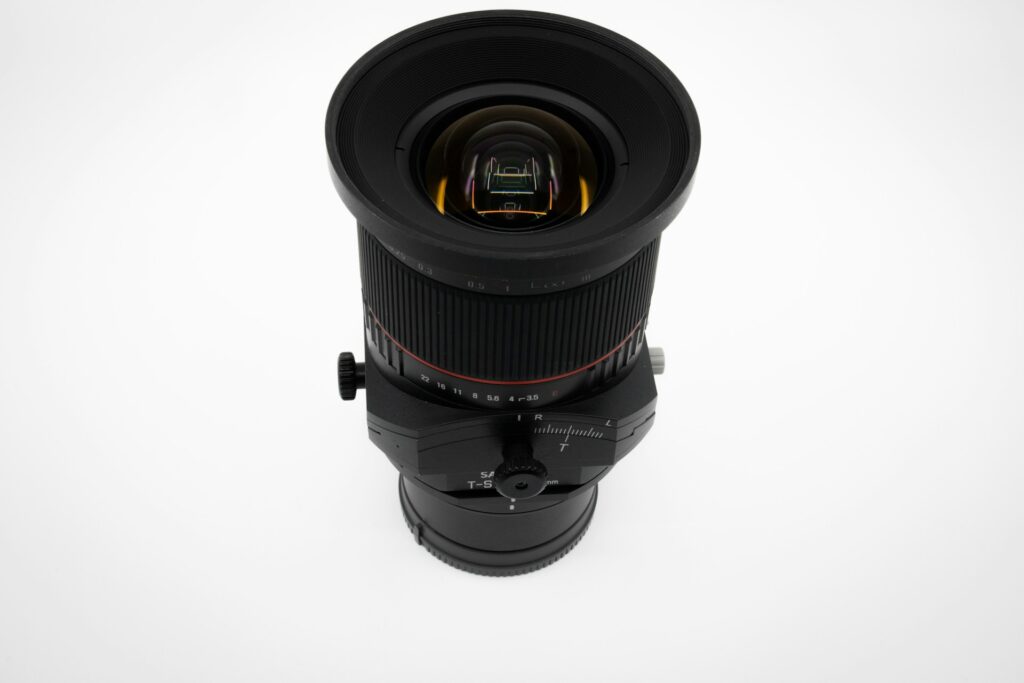
However, you need special equipment — a tilt-shift lens — to get this effect. You can still figure out how to create a tilt-shift effect without one, but it won’t be as accurate. Simply angling your camera doesn’t misalign the focal and image sensor planes, so you won’t get that desirable three-dimensional or false miniaturization outcome.
That said, you can add false tilt in post by blurring the top and bottom of your image and adding linear sharpening in the center. Adjusting the perspective with a vertical cropping tool can help you force perspective.
What Is a Tilt-Shift Lens Good For?
A tilt-shift lens — also called a perspective control lens — changes the position of the camera lens relative to the image sensor, so they’re no longer parallel. It alters the depth of field, enabling you to seemingly take photos from different vantage points without physically moving.
The tilt control determines the focal plane. It changes focus and blur by angling the lens relative to the image sensor plane. The shift control — an entirely separate knob — alters perspective by moving the lens up, down, left, or right, helping you capture converging lines.
While having this lens is convenient, it’s unnecessary. The technique predates these lenses, proving you don’t need special equipment to take visually stunning pictures in this style. If you’re not convinced, know that the best options typically cost thousands of dollars — even the cheapest options are roughly $500, which is a significant investment.

Learning how to create a tilt-shift effect with a standard lens can be difficult because maintaining the correct position and adding after-effects takes patience and precision. However, you get fewer distortions like stretching or chromatic aberration — a type of color artifact that happens when light hits the focal plane irregularly — because you’re not messing with the lens.
So, do you need a tilt-shift lens? Many amateur photographers — and professionals on a budget — make do with standard equipment. In other words, don’t feel like you need one if you’re only going to dabble with this photography style.
Even if you want to get serious about it, consider experimenting with a standard setup and various free tools until you feel ready to commit to high-end gear. Forcing yourself to do things the hard way can help you mature as a photographer.
How to Create a Tilt-Shift Effect
If you don’t have a tilt-shift lens, you can still figure out how to create a tilt shift effect with an image editing tool. In Adobe Photoshop, you go to Filter > Blur Gallery > Tilt-Shift and drag and rotate the pin to specify and adjust intensity. You can set sharp, fade and blur areas. You’ll want to make the top and bottom fuzzy while keeping the center clear.
You can also create the tilt-shift effect with free tools like the GNU Image Manipulation Program. This image editing program — called GIMP for short — could save you thousands of dollars annually if you typically use Photoshop.
On GIMP, select the perspective tool — the wireframe cube icon — from the left-hand toolbox. Click on your image to activate it. When you finish adjusting blur and sharpness, press “Transform” to finalize your changes. You could also add linear blur manually or use a plugin.
Can You Get This Effect With a Phone?
Yes, you can get the tilt-shift effect on your phone by angling it while zooming in. You can add linear blur and sharpness with an app or native editing software afterward. For instance, on iPhone, you’d go to Edit > Vertical to change perspective.
While tilt-shift photography with a phone is possible, the illusion won’t be as pronounced. However, you can still capture visually stunning images. Remember to prioritize capturing interesting angles and ensuring your converging lines are parallel.
Learning how to take tilt-shift photos with a smartphone should come somewhat naturally to you as you experiment with different subjects, positions and angles. Since you’re not using standard photography equipment or a specialized lens, feel free to try unconventional techniques.
What Apps Have a Tilt-Shift Effect?
Plenty of apps have linear blur or sharpening tools — if not an outright tilt-shift tool — you can use on your phone. Remember, since this technique relies heavily on perspective, you’ll want to tilt your image, too, to get the desired effect.
Snapseed offers a linear lens blur option. Stacking the effect — increasing its intensity the closer to the top and bottom you get — will give you the classic tilt-shift look. Consider sharpening the middle section or increasing saturation.
Fotor has an outright tilt-shift tool you can use whether you have an Android or iPhone. There is even a basic web editor you can use on desktop. Go to Adjust > Blur > Linear to begin. Here, you can place a strip, change its intensity, and more.
Now You Know How to Create a Tilt-Shift Effect
Now that you know how to create a tilt-shift effect, you can begin experimenting. You might find editing your image to achieve the illusion is easier than taking a convincing angled image — or vice versa. Either way, remember that this is a fun learning experience.
About The Author
Cooper Adwin is the Assistant Editor of Designerly Magazine. With several years of experience as a social media manager for a design company, Cooper particularly enjoys focusing on social and design news and topics that help brands create a seamless social media presence. Outside of Designerly, you can find Cooper playing D&D with friends or curled up with his cat and a good book.


