

Do you want beautiful prints without awkward edges or lost content due to the printer cutting part of the page off? Paying attention to bleed in printing helps you create stunning interior layouts and covers from one edge of the page to the other. Bleeds are crucial for everything from posters to paperback books to brochures. Understanding what the printing term is and how to utilize it properly can save you frustration.
What Does Bleed in Printing Mean?
Bleed in printing is what extends past the page’s edges. It is the thin margin around a document’s final dimensions. It’s the area the machine should cut off during the printing process. To understand it fully, you should know the other relevant terms.
Here is some essential printing terminology :
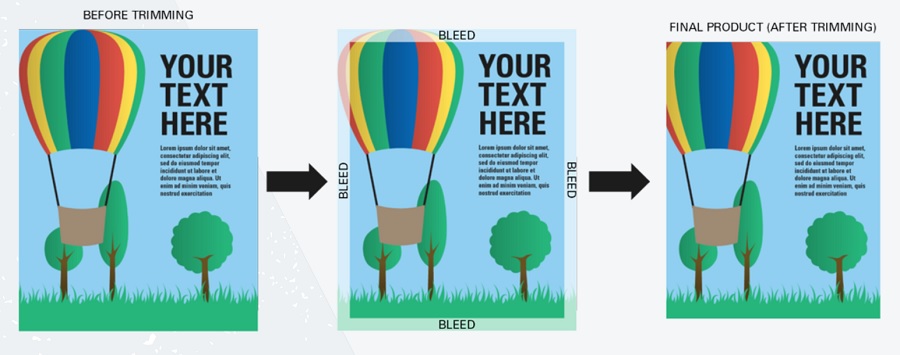
- Bleed: The area extending past the crop marks into the margins. It’s past the trim, where the design should technically cut off. You only use it to prevent uneven white margins.
- Trim: A paper’s trim size is its dimensions after the printer has handled it. In the pre-printing check, it shows the designer where the machine is supposed to cut.
- Crop marks: The marks telling the machine where to cut the paper. They go at the horizontal and vertical edges.
- Live: The area on the page that is safe for the design. No text, images, or important graphics should extend beyond it. The bleed and live are right next to each other, so the boundary is vital.
Printers have to hold a document in place to print the design on it, creating a white space around it. Machines also sometimes misalign and cut incorrectly, which has the same effect. Bleed fills in the area past the trim to ensure there is no odd emptiness.
Why Is Bleed Important?
Cutting technology has made cutting and cropping a document more effortless and seamless, but it isn’t always perfect. Sometimes, the printing isn’t precise, making the design look messy and the printed document unusable.
In the design world, small mistakes can significantly impact the final product. Say a designer wrongly sets an indent or alignment by one centimeter. This can cause the printer to unintentionally cut a large chunk of important information, which means the design is back to the designer for realignment and the publisher for a reprint. This, in turn, wastes resources and time.
Incorrect placement on the cover can result in the title or author’s name being cut off or the entire image appearing skewed and out of alignment.
Another reason for bleed is the printer itself. Some printers run a garish white strip when they start or finish printing a document. This line happens if there is movement during the printing process, which can be unavoidable. The white strip can compromise the final product, making the printing look cheap and low-quality even if the design is sophisticated. Due to this, many choose digital printers, which provide better and consistent quality.
Bleed solves all these problems by providing white space on either side or all sides of the design. Any design elements that go past the safety zone created by the white space are at risk of being removed in the final product. It avoids printing and design errors and improves the document’s printing quality.
Bleed is for the printer’s eyes alone — it is never meant to be in the final product. Bleed makes a document to be printed slightly larger than its usual size to accommodate cutting down to the right size after. This gives the designer a safe space to size their design and reduces their stress in producing a perfect output every time.
Does Bleed Affect the Design?
Bleed doesn’t change the overall design. Instead, it just ensures everything looks good and there isn’t any odd-looking empty space in the margins. Even minor mismeasurements can leave uneven gaps on the edges of a project, potentially ruining it. Instead of getting an even border, you can end up with small, skewed slivers of white on random edges.
That being said, extending your design past the trim can change how it looks. Since you use bleed exclusively for this purpose, it can elevate your project. Art, photos, and graphics that fill the entire page will typically look more clean and spacious.
The effect is so significant that many kinds of designs almost exclusively print without white margins. For example, it’s rare to see a book cover or business card with empty space around the edges. Imagine how a magazine cover would look if it had a white border instead of taking up the entire page — it might look out of place or take away from the design’s appeal.
When your design takes up the entire page, it has an air of authority and looks visually appealing. While you don’t technically need a bleed to achieve this look, it ensures you do. The result is an impressive, professional, clean project with a unique artistic appeal.
Should You Add Bleed When Printing?
You should add bleed when printing if you want your design to take up the entire page. It’s the only way to ensure your background evenly extends to the borders. Plus, it can save you a tremendous amount of time since you won’t have to reformat or manually trim. If you prefer borders or still need to hit the goal of having 40% white space, then don’t use it.
Not using bleed can be a stylistic choice. Many projects look much more clean and legible when they have a nice white border. If you don’t want to use it, continue printing as you normally would and keep your design in the live area.
Alternatively, not using bleed can be a money-saving choice. When you use bleed in printing, you technically waste ink. Unless you use a laser printer, it can get expensive. In fact, it costs around $35 for a color cartridge and $25 for a black one. Those numbers add up quickly when they only last for a few months at a time.
Someone who prints infrequently shouldn’t worry about the cost of using extra printer ink in the bleed. However, small business owners and college students should be mindful. It can elevate the design, but it isn’t essential for every kind of project.
What Does Bleed Look Good On?
Bleed looks good on a wide variety of things. Usually, it’s most common in magazine covers, posters, photos, book covers, and banners. However, you’ll also see it on stickers, labels, business cards, infographics, and letterheads. Technically, any project can use it and look good.
People in marketing commonly use bleed on various print materials because it looks clean and professional. Try to remember if you’ve ever seen a movie poster with huge, empty borders — it doesn’t happen often. The type of project you work on determines how often you use it.
For instance, professional and editorial work often uses bleed in printing to appear more artistic and prominent. Images and designs draw much more attention when they’re the only thing on a page. The audience views them as the most important thing on the paper instead of additions.
However, there aren’t strict rules around when you should use bleed in your designs. For example, artwork prints typically look more professional with no white borders. On the other hand, you might want white margins to save ink if you plan on framing your work.
How Do You Add Bleed in Printing?
You can add bleed in printing through your platform’s dedicated bleed feature or create a new, larger document. Many design apps — like Adobe and Canva — give you the option to set it before you print. However, some don’t have this feature. Luckily, there’s a way to do it manually.
You can simply create a new document to add it by hand. Whatever you do, don’t use the default settings. What should the bleed be in printing? The The standard US bleed is .25 inches, but you adjust it as you need. To put it into perspective, an 11” x 17” poster should be around 11.25” x 17.25” on average. You could make it bigger, but you’d only be wasting ink. Please note that every printer has different bleed requirements, so you should refer to documentation to see how much bleed to add for the best results.
However, the bleed’s size does increase with your document. For instance, if the poster were 18” x 24” instead, you would want 18.5” x 24.5” dimensions. A half-inch is typically the largest you need unless you’re working on a massive project like a banner or billboard. Adjust the area’s width whenever you change your document size to avoid bleed errors.
Other than sizing, the fundamental rule is to not add anything to the bleed you aren’t comfortable with losing. Since it’s the area the printer is supposed to get rid of, you risk cutting off your design if you put it past the live space. The best approach is to extend your background color or pattern beyond the trim.
In addition, it is essential to consider a suitable layout and page size to ensure sufficient bleed area. Also, consider using legible and clear font style options and sizes and positioning them efficiently on the page. Finally, remember to ensure the client’s logo is fully visible in the design.
Bleed in Printing Mistakes to Avoid
If you’re new to creating documents or sending them to printers, you’ll want to avoid these common mistakes.
Designing Before Adding Bleed and Crop Marks
It’s common for graphic designers to create the image and then decide to add crop marks, but designing using a full page and then trying to adjust things is time consuming and may miss the mark on excellence.
Using the Wrong Bleed Amount
If the bleed parameters are incorrect, you’ll risk chopping off areas you wanted to keep. Not only can you get bleed requirements from your printer, but you should get them to ensure your setup is correct. In addition, some printers will reject your files if the bleed spacing is off. For example, Amazon’s Kindle Direct Publishing will reject a book where the bleeds cut off some of the text.
Elements Spaced Poorly
When designing, allow enough room for some white space around crucial features of your design. For example, if you’re creating a book cover, you want the author’s name and title to have some space so they don’t sit right at the top, edges or bottom of the page. Take a step back and look at your design critically through the lens of what it will look like when the printer cuts the pages.
Plugging in White Borders
Beginners sometimes add a white border around the design to mark the bleed. The problem with doing this is that printers don’t cut precisely on the bleed line. They sometimes cut a bit into it our outside the line. You can wind up with a printed copy that has white on one edge only or around the entire design. It is best to extend your design to the edge of the page but take any layered elements inside the bleed marks.
Do You Need to Use Bleed?
Whether or not you use bleed in printing is up to you. While some types of print design use it almost exclusively, it’s not essential. A borderless design can look fantastic and professional, but a bleed can waste ink and isn’t necessary. It’s a good idea to repeatedly decide for every project you have instead of choosing one method and sticking to it.

Leave a Comment