The outer packaging often sells the interior of a book. Whether you’re writing the next great American novel or trying to share your expertise in your field, putting together a product is easier than every before. Thanks to publishing options, such as Amazon’s KDP, Draft2Digital and Ingram, you can launch your story and gain readers fairly quickly.
Designing a book cover may seem like a daunting task. If you have some graphic design experience, knowing how to design a book cover is more intuitive. You likely already have experience working with programs such as Adobe InDesign, Photoshop or Canva.com.
What happens if you’re a business owner with zero design skills? Perhaps you offer coaching or courses but designing a book seems out of reach. Fortunately, we can explain how to come up with a simple cover in a few easy steps.
According to Statista, publishing houses and independent authors sold approximately 767.36 million print books in 2023. When you look at ebook and audiobook figures, the number is even higher.
How to Design an Ebook Cover
How do you design a book cover for an electronic edition without spending a small fortune? While some cover designers command hundreds of dollars for a simple ebook cover design, there are plenty of less expensive options available. You can always hire a graphic artist on Fiverrr or join Facebook groups dedicated to book cover designs and find someone wanting to gain experience.
The cost of an ebook cover can range anywhere from free to $500. If you’re just starting out, going with the free options and designing the cover on your own makes the most sense. We’ll share tools and tips to guide you. You should join groups of designers and get feedback so you can tweak the finished product into something readers will want to buy.
Tools
You’ll need to use a graphic design program to create an ebook cover. Some of our favorites, include:
- InDesign
- BookBrush
- Canva
- GIMP
Self-publishing sites such as Amazon KDP and IngramSpark offer cover generators. You can bring your own image you photograph, design or buy off a stock photography site. The cover wizards will let you choose from a background color, add text in various fonts and make a few simple changes to create a unique look. The tool warns if the resolution needs increased.
Tips on How to Design an eBook Cover
We could fill a book with the different things to keep in mind when creating a cover that sells your product. To keep to the point, we’ll discuss a few of the best tips.
- Know your genre. If you wrote a romcom and everyone else is using illustrated covers, try to adopt the same style while remaining unique.
- Short titles fit better. Some people have gone to super long titles in an attempt to grab keywords. However, fitting a 10-word title on a book cover is complex.
- Go for the font that is readable in thumbnail size over the font that is cute.
- Pay attention to contrast. If the background is dark, the text should be light and vice versa.
- Know your dimensions. While sites will adjust your image, you don’t want it to look skewed or blurry.
Talk to other authors and find out what they wish they’d known before they made their first cover.
Steps to Use Canva
Although there are many tools available to make book covers, Canva is one of the simplest. If you upgrade to a Pro account for around $15 per month, you gain access to their extensive stock image and template library.
1. Log in to Canva
2. Search for a book cover template
3. Select one similar to the look you’re going for
4. When the template loads, click on “Elements” and search for images related to your topic.
5. Drag and drop images into place. You’ll need to practice a bit to get just the right angle to fill the entire background and learn how to use the guides.
6. Change the font and adjust the wording.
7. Save the image in a high quality file and upload to the publishing platform of your choice.
How to Design a Print Cover for KDP
If you wish to design a book cover for print, you’ll need to take a couple of extra steps. Ingram has its own platform and different requirements. Since KDP is popular for first-time writers and low cost, we will focus on how to design a print cover and upload it to KDP. Again, we are going to look at Canva.com, but you can certainly take these tips and apply them to InDesign, BookBrush and other sites.
How to Design a Book Cover in Canva for Print
You can set custom dimensions for a project in Canva, so you’ll have a much easier time getting the sizing right for a print book than you might expect. I’m going to create a mock cover and share my process with you, including how I change things along the way for a better look. This is a very simple example but should show the steps.
Step 1: Get a Template from KDP
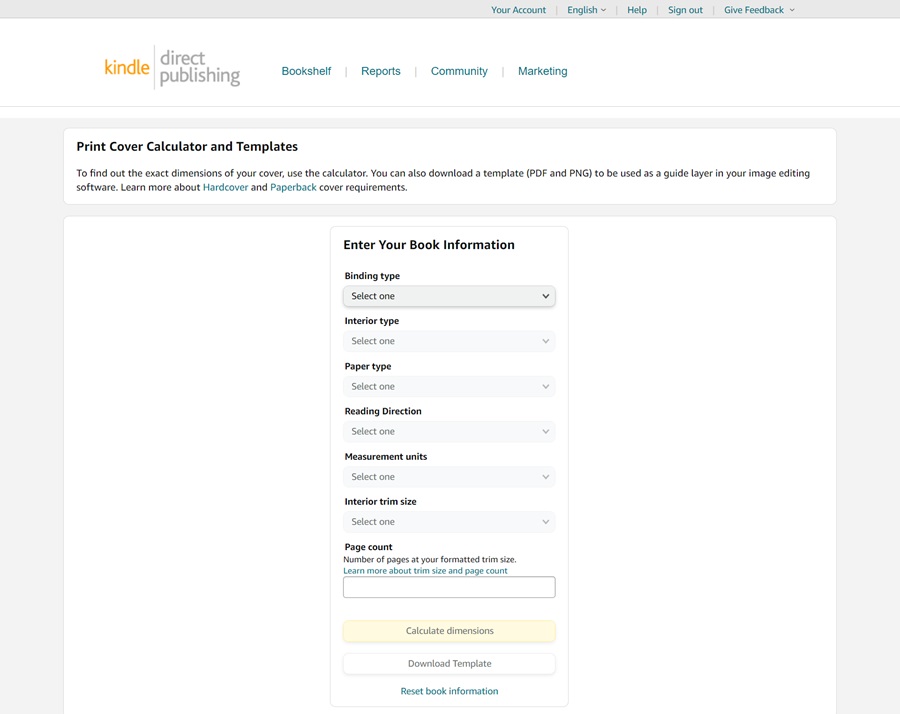
KDP offers a cover calculator to show the dimensions a finished book cover should be. You’ll wrap around the spine and need space for the front and back. A print cover also has a bleed area unless you want the image to fall off the edges and won’t be cutting title or other elements away.
Go to the cover calculator page and input the binding type, interior pages, measurements and finished book size. Click on calculate dimensions. If you are publishing a book in most romantic languages, you’ll choose left to right for the reading direction and inches for measurements.
Click on “Calculate” and you’ll get a template with dimensions. Download the template and take note of the dimensions listed above it. You may want to take a screenshot or leave the page open until you have your new Canva project ready to go.

Step 2: Create a Document in Canva.com
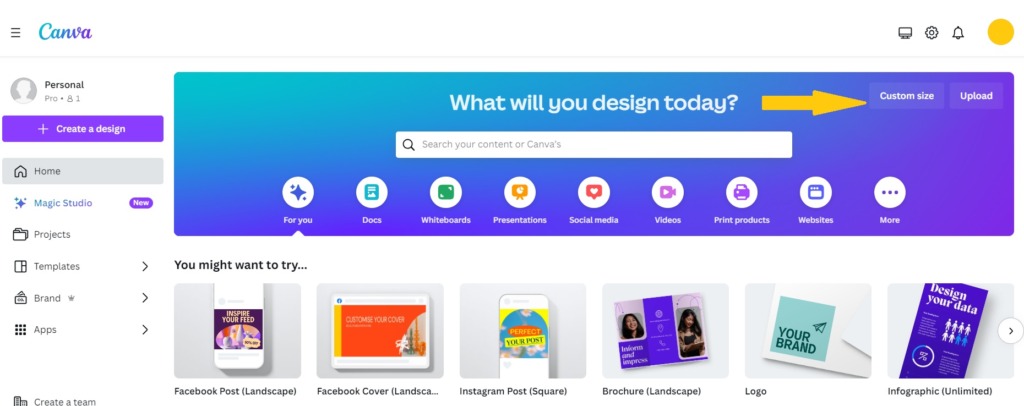
Navigate back to Canva.com and click on the button near the top right that reads, “Custom size.” For your dimensions, you want the full cover size, which is item #1 in the KDP cover calculator results. In this instance, 12.8 inches by 9.25 inches.
Go ahead and make a cover with those dimensions. Notice the perforated lines on the template. These show where your bleed lines are. You want to keep all designs inside the bleed lines unless it is something you don’t mind being chopped off like a plain background.
Step 3: Upload Template and Design Cover
When the template loads, look to your left. You’ll see icons such as “Design,” “Elements” and “Text.” You want the “Uploads” icon. Click on it and then in the next column to the right, click on the purple “Upload Files” button.
Note that you’ll need to unzip the downloaded template first and then upload the PNG file for the cover template. Once it uploads, click and drag it into the frame in the center portion of the screen, where you’ll design your cover. The template shows you where to locate various elements.
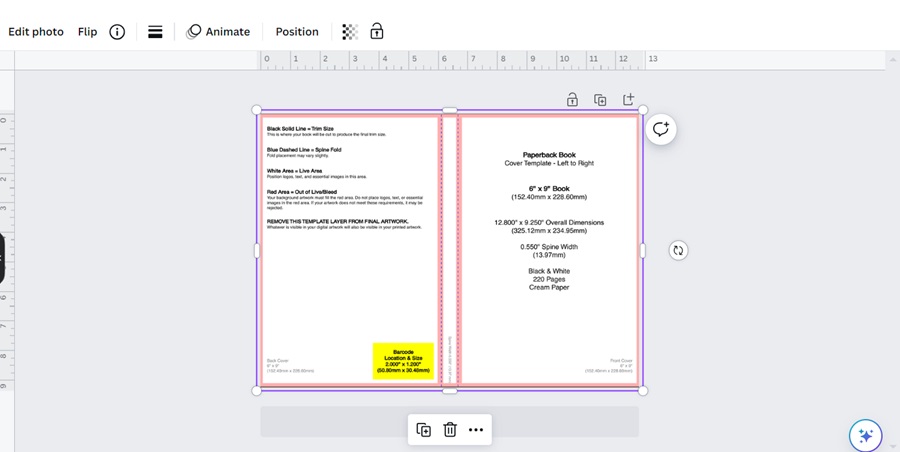
Your project should look something like the image above. Here is where you can play around and have fun.
Step 4: Utilize Transparency and Position

Look above the project at the menu options. See the icon that denotes transparency? Click on it and adjust the scale. The idea is to make the cover template slightly transparent so you can see where to place objects on the front, back and spine correctly. You can also click on the positive button and move the template forward or backward as needed while you design.
Step 5: Background Image

Find an image that will stretch across the entire space or use different images on front and back covers with a solid covered spine or a gradient. The key is to ensure everything blends well. You can always flip the cover template forward and backward to ensure the design is the way you want it to appear.
Step 6: Add Title and Details
Add your title, author name and any other text first. You want to ensure it stays inside the lines on the template. I always pad it a bit just in case the printer cuts a bit more from the edge than I think they will. This has always worked well with KDP.
Here are two images to show you how you can flip back and forth between layers and see how it might look and check alignment.

Moving the template to the back layer allows you to see how the finished cover might appear.
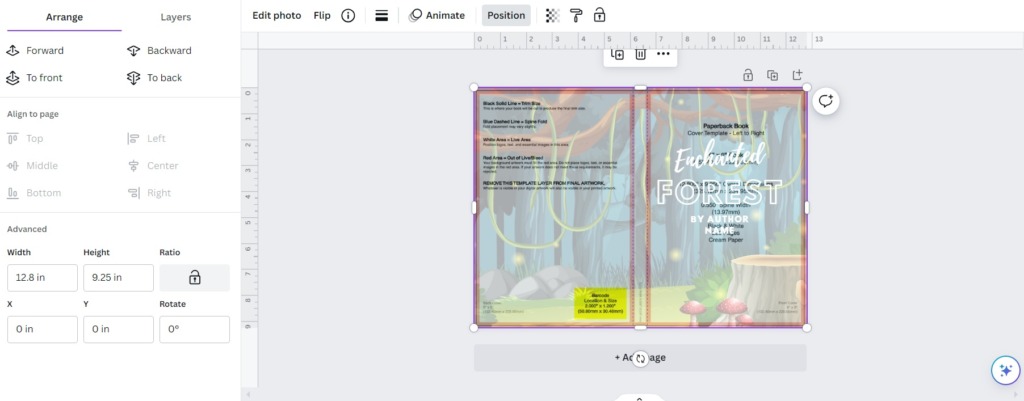
Moving the template back to the front shows if everything is inside the bleed lines.
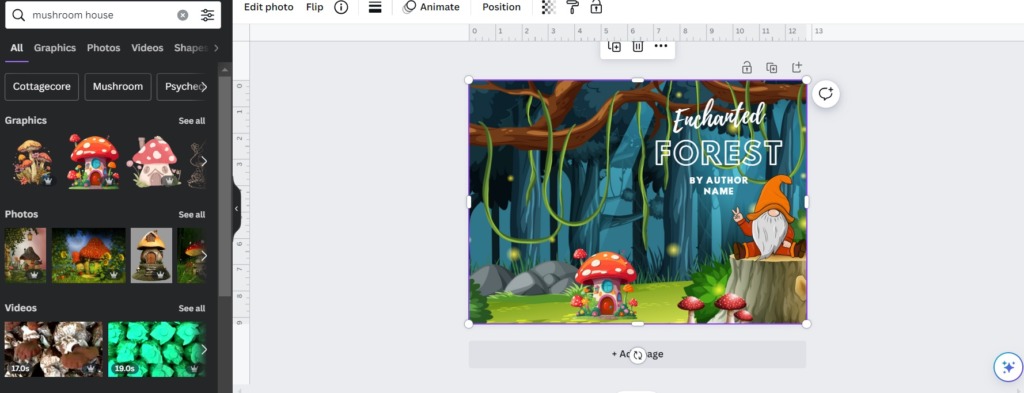
Next, use graphics and photos to add in details to make your cover unique. For example, for the cover above, I might use some fairies, mushrooms or fireflies to create more interest.
Keep Tweaking
Note that I added a cute gnome and a mushroom house on the back cover, slightly crossing over onto the spine. This is simple but you can get more complex if you’d like. Keep layering, adding and taking away until you like the overall look and it speaks to what your story is about.
Next, double-check by bringing the template forward again. Is all text inside the bleed lines? Did any elements you add go too far to the edge? Avoid cutting off your gnome’s head, for example.
Step back from your computer and look at it all. With the simple addition of the gnome above, I had to move the title so it was still readable and not covering him. Moving the template forward, I realized I pushed the letter F partially into the spine.
Once you have the title and details perfected, add some text to your spine. Typically, this is the title of the book and the author name. You can also leave this area blank if you wish.
I like to bring the template forward and use a shape box. Size it to fit perfectly inside the lines on the template. I may change the color of the shape and make it transparent or lose it altogether. You’ll need to try different methods until you hit on the one that makes your text readable but is still aesthetically pleasing.

I chose to make the shape a little less transparent after moving the template to the back again, as you couldn’t read the title well. The background still peeks through the slightly transparent shape, but the text is more readable, as you’ll see in the final image.
Step 7: Create Back Cover Blurb
Keep your back cover blurb to a paragraph or two. If you plan to add an author headshot, you may want to stick with a single paragraph. As I moved to the back cover, I realized the mushroom house was covering the barcode. I moved it to the left side to make room. KDP will place the barcode for you. While you can certainly upload one, it’s easiest to let them handle it.

You probably notice a number of changes in this latest version. The slightly transparent shape background is gone and the text becomes white for now so it pops against the background. The mushroom house moves to the left to make space for the barcode. A shape box is in the middle of the back cover, white, slightly transparent and a short blurb in a contrasting color appears.
This part of the process will take you some time. You’ll have to try different color palettes, shapes and arrangements. Between each, you will flip back to the template to ensure everything is placed correctly. It can be time consuming, but the finished product is fairly professional looking for a DIY project.
Step 8: Double Check Everything Is Inside Lines
Your final step is to do another check with the template on top and transparent enough to see your final design. Is all text within bleed lines? Are things lined up correctly? You need a balance in the design. The blurb box should be centered but some other images can utilize the Rule of Thirds for artistic appeal.
I am sharing my mistakes with you as I go so you can see what to look for in your own designs. I spotted a glaring typo in my final check. Do you see it? I misspelled the word “upheaval.” I fixed it.

It is nearly impossible for one person to spot every error. It’s wise to have a colleague double-check your spelling and placement. They may see something you missed.
Step 9: Download in the Right Format
If you’re happy with the way everything looks, go to File/Download.
For KDP paperback, you’ll need a PDF file. You want to select PDF Print and then under “Color Profile,” choose CMYK (best for professional printing). Download the file and upload to KDP.
If you need a JPG file for a different platform or promotional purposes, choose JPG but set the quality up from 80 to 300. You need a minimum of 300 DPI for print. If you get errors, you may need to download as a PDF and convert it or maximize the resolution through a third-party site.
Enjoy the Process
Learning how to design a book cover throws a learning curve. However, it is an artistic process and can be a lot of fun. Enjoy the journey, try different techniques and come up with something that speaks to your writer’s soul. Once you put your design up on the publishing platform of your choice, you’ll be able to gauge how effective the design is or if it needs additional tweaks. You’ll save a fortune doing the designs yourself.
About The Author
Eleanor Hecks is the Editor-in-Chief of Designerly Magazine, an online publication dedicated to providing in-depth content from the design and marketing industries. When she's not designing or writing code, you can find her exploring the outdoors with her husband and dog in their RV, burning calories at a local Zumba class, or curled up with a good book with her cats Gem and Cali.
You can find more of Eleanor's work at www.eleanorhecks.com.


